

The holiday season is synonymous with the sweet aroma of baking, with a sugar cookie recipe often at the heart of festive culinary traditions. The crafting of these delectable treats is not just about following a set of instructions; it is an art that demands precision, patience, and a touch of creativity. A flawless sugar cookie recipe is the cornerstone of holiday baking, transforming simple ingredients into memorable moments of joy. These cookies serve not only as a beloved snack but also as a canvas for artistic decoration, making them a centerpiece of holiday celebrations.


This article delves into the essential steps for creating the perfect sugar cookies, from understanding the foundational ingredients that ensure a tender, delightful texture to mastering the art of decoration. The journey to a flawless sugar cookie recipe involves various critical stages:
preparing the dough to achieve the right consistency, rolling it out to the perfect thickness, cutting out festive shapes, and baking them to golden perfection. Furthermore, decorating your sugar cookies adds a personal touch that can turn these treats into unique gifts or a festive activity for the entire family. With a focus on these key elements, readers will be equipped with the knowledge to bake sugar cookies that are not only visually appealing but also irresistibly delicious.
Understanding the Ingredients

Essential Ingredients for Sugar Cookies
Sugar cookies are quintessentially made from a simple yet precise blend of ingredients. Key components include butter, sugar, eggs, and vanilla extract, which provide the foundational flavors and textures. Flour acts as the structure, baking powder as the leavening agent, and a pinch of salt to balance the sweetness. For those opting for a gluten-free version, a 1:1 gluten-free flour blend with xanthan gum is recommended, as it mimics the properties of traditional flour while maintaining the desired texture.
Substitute Ingredients
Adapting sugar cookie recipes for dietary preferences or health considerations doesn’t mean compromising on taste. For a sugar alternative, Swerve Sweetie Sweetener or monk fruit can be used, offering a reduction in sugar content without sacrificing sweetness. Those avoiding dairy can substitute organic grass-fed butter with vegan butter options.
For egg-free diets, although not tested in every recipe, egg substitutes may be experimented with. Additionally, for those avoiding synthetic colors, natural colorants like beetroot powder, turmeric, and spirulina can replace traditional food coloring, adding a creative twist to the cookies.
Ingredient Tips
When selecting butter, the texture is crucial; unsalted butter that’s just soft enough to leave an indentation with a fingertip is perfect. Freshness and room temperature are key for eggs to blend evenly into the mixture. Pure vanilla extract is preferred over imitation for its superior flavor. If using all-purpose flour, ensure it is lump-free, possibly by sifting.
For those experimenting with whole wheat flour, limit it to a quarter of the total flour content to avoid overly dense cookies. Lastly, when incorporating spices or flavorings, consider infusing them into the butter for enhanced taste, such as heating butter with vanilla bean or cinnamon sticks, which allows the flavors to meld beautifully.
Preparing the Dough
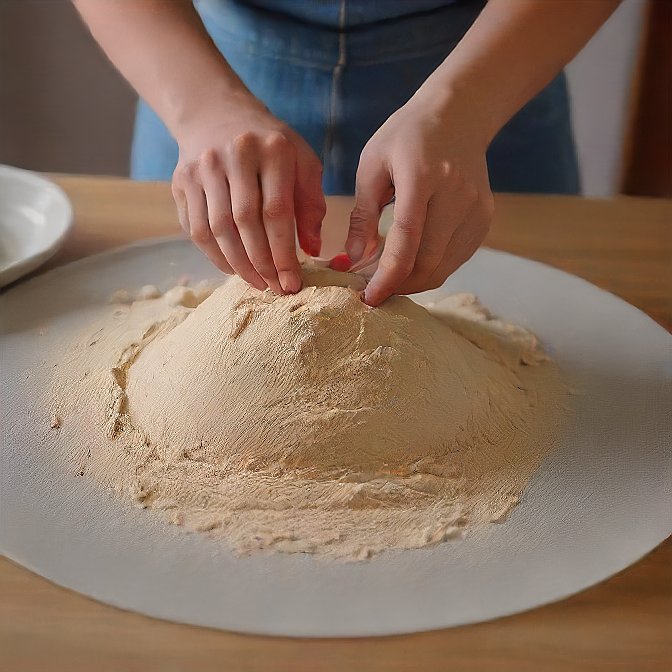
To achieve the perfect sugar cookie dough, one must follow a meticulous process that ensures the dough is both easy to handle and yields delicious results. Here’s a detailed guide on how to prepare the dough, including essential mixing tips, the importance of chilling, and common mistakes to avoid.
Mixing Tips
Begin by adding the required amount of softened but still slightly cold butter to your stand mixer. Cream the butter on medium-high speed for about 1-2 minutes until it becomes smooth and lighter in color. This process introduces air into the butter, which is crucial for a fluffy texture. Gradually add sugar and then the eggs while the mixer is on a low setting. Once combined, turn off the mixer to scrape down the sides of the bowl, ensuring all ingredients are well incorporated.
Next, add vanilla and, if desired, almond extracts to the mixture and combine on low speed. Continue by adding baking powder and then flour, half a cup at a time, ensuring each addition is fully incorporated before adding the next. It’s vital to mix the dough just until the ingredients are combined—overmixing at this stage can lead to tough cookies.
Chilling the Dough
Chilling the dough is not merely a suggestion but a critical step in the cookie-making process. For standard chilling, wrap the dough in plastic wrap and refrigerate for at least 30 minutes, or place it in the freezer for 15 minutes. This step helps the fat in the dough firm up, which prevents the cookies from spreading too much during baking and results in a more desirable texture.
For those short on time, an unconventional yet effective method involves placing the dough in a resealable plastic bag, flattening it to about half an inch thick, and submerging it in an ice water bath for 20 minutes. This method not only chills the dough quickly but also hydrates the flour, enhancing the dough’s texture and flavor.
Common Mistakes to Avoid
One of the most common pitfalls in preparing sugar cookie dough is overworking it. Once the dry ingredients are added, mix only until they are just incorporated to maintain a tender texture in the baked cookies. Additionally, ensure the butter is not too warm as this can make the dough crumbly and difficult to handle.
Another mistake is insufficient flour, which can cause the cookies to spread excessively. It’s crucial to measure the flour accurately to avoid this issue. Conversely, adding too much flour can result in hard and crumbly cookies, so balance is key.
By adhering to these tips and techniques, bakers can ensure their sugar cookie dough is perfectly prepared for rolling, cutting, and baking into delightful treats that capture the essence of the holiday season.
Rolling Out the Dough
Tools You Need
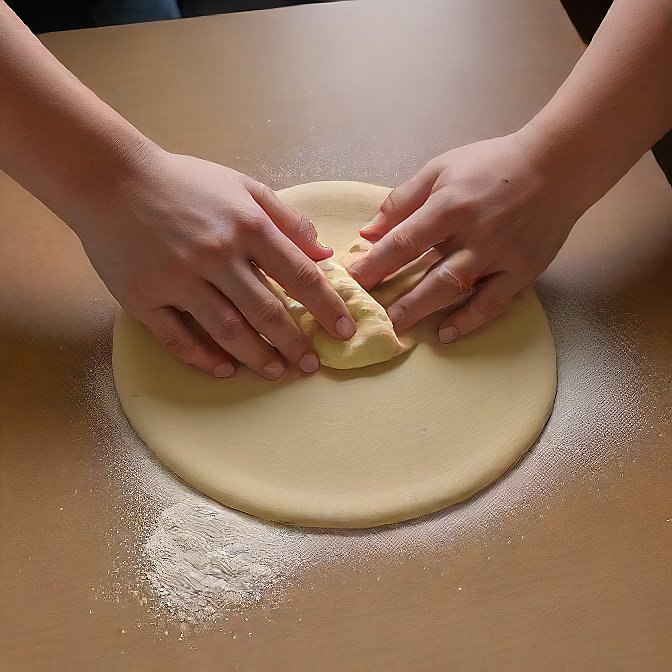
To achieve the best results when rolling out sugar cookie dough, having the right tools is crucial. Start with a high-quality rolling pin, preferably one equipped with thickness guides or rings. These guides help maintain an even thickness across the dough, usually set between ⅜ inch and ½ inch, which is ideal for sugar cookies that are soft yet durable enough for decorating.
Additionally, using parchment paper or a silicone baking mat can provide a non-stick surface, making the rolling process smoother and cleaner. For those who find the dough sticks or if they prefer an alternative method, placing the dough between two sheets of wax paper can also be effective.
Rolling Tips for Flawless Cookies
Begin by lightly flouring the surface where the dough will be rolled. If using parchment paper, secure it to the countertop with tape to prevent slipping. Place the prepared dough on the floured surface and sprinkle a bit more flour on top. Use the rolling pin to gently press the dough into a disc before starting to roll. This initial flattening helps prevent the dough from breaking or buckling under the pressure of the rolling pin.
Roll the dough slowly and gently, starting from the center and moving outward, ensuring not to press down too hard to avoid over-thinning. The key is to inch towards the desired thickness gradually, which prevents the dough from cracking. If the dough becomes sticky, a minimal dusting of flour can help, but be cautious not to over-flour as this can dry out the dough and affect the texture of the cookies.
Common Pitfalls
One common mistake is overworking the dough. Over-kneading or rolling the dough too much can lead to tough cookies due to the development of gluten. To avoid this, mix the dough until just combined and handle it as little as possible during the rolling process. Another issue arises from rolling the dough unevenly, which can lead to uneven baking. Using a rolling pin with thickness guides can mitigate this problem by ensuring uniform thickness throughout.
Additionally, it’s important to cut the cookies immediately after rolling out the dough. Delaying this step can cause the dough to warm up, especially in a warm kitchen, making it sticky and more likely to spread during baking. If the dough becomes too soft or warm, placing it back in the refrigerator for a few minutes can help re-solidify the fat, making it easier to handle.
By following these guidelines and using the proper tools, one can roll out sugar cookie dough effectively, leading to beautifully shaped cookies that maintain their form and texture after baking.
Cutting Out Shapes
Choosing Cookie Cutters
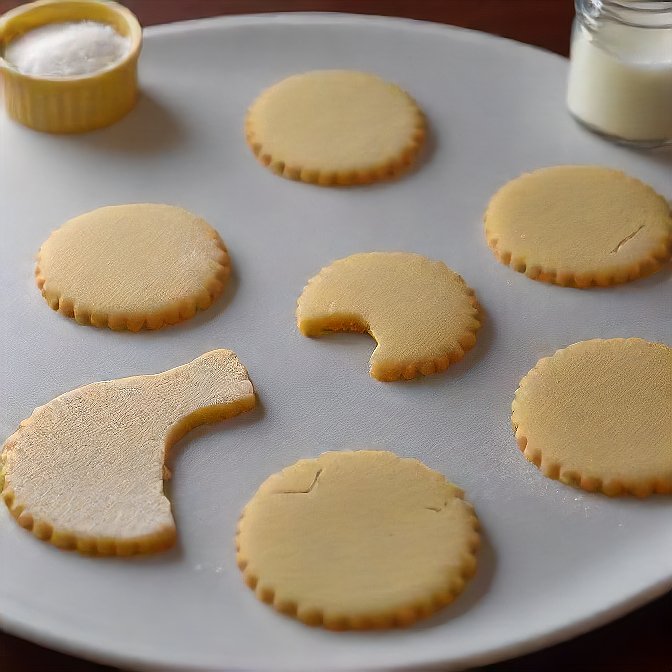
When selecting cookie cutters for your sugar cookies, consider both the shape and size appropriate for your occasion. For instance, intricate shapes like snowflakes or reindeer are perfect for Christmas, while hearts or flowers suit Valentine’s Day. Material-wise, metal cutters offer sharp, clean edges, while silicone provides flexibility and non-stick properties. Always verify the dimensions, especially when dealing with intricate designs, to ensure the cutter fits the intended design without distortion.
Cutting Tips
To optimize your cookie cutting process, start by rolling your dough between two sheets of parchment paper. This prevents sticking and ensures uniform thickness. When cutting, begin from the outer edges of the rolled-out dough towards the center. This technique maximizes the number of cookies per roll and minimizes the need to re-roll scraps, which can cause the cookies to spread due to the dough warming. Dip your cookie cutters in flour between each use to prevent sticking and achieve a clean cut.
Preserving Cookie Shapes
After cutting, chill the shaped cookies on a parchment-lined baking sheet in the refrigerator for about 30 minutes. This step is crucial as it firms up the fat in the dough, reducing spreading during baking and helping maintain the cookie’s shape. Avoid overhandling the dough to keep it cool and manageable. When arranging cookies on the baking sheet, leave sufficient space between them to allow for slight spreading. For best results, use a rimless baking sheet to enhance air circulation and even baking.
By adhering to these guidelines, your sugar cookies should retain their shapes and delight both the eyes and the palate.
Baking the Cookies
To ensure your sugar cookies turn out perfectly every time, follow these detailed steps for baking, rotating, and cooling.
Baking Times and Temperatures
Bake your sugar cookies for 10-12 minutes at the temperature recommended in your recipe. They should be just set and beginning to brown around the edges. Keep in mind, the longer they bake, the crispier they will become. It’s crucial to use a light-colored aluminum half sheet pan for baking, as dark nonstick pans can cause excessive browning and might even burn the bottoms of your cookies. Remember, never spray your baking sheet, parchment paper, or silicone mat with nonstick cooking spray, as this can lead to too much spreading and browning.
How to Rotate Baking Sheets
For even baking, it’s often advised to rotate your baking sheets 180 degrees about halfway through the baking time. This step is especially important in non-convection ovens, as they can have hot spots that might cause uneven baking. If you’re using two pans, swap their positions as well—whether side by side or on separate racks. This ensures that each side of the cookies gets equal exposure to the heat source, preventing one section from drying out or browning too much. Keep the oven door open for as short a time as possible to avoid significant temperature fluctuations.
Cooling Tips
Once the cookies are done, the cooling process is just as important as the baking. Allow the cookies to sit on the baking sheet for about 10 minutes before transferring them to a wire rack. This helps them set properly without becoming too hard. If you aim for crispy cookies, ensure they cool completely on a wire rack to allow excess moisture to escape.
For chewier cookies, a slightly shorter cooling time on the rack will suffice. Avoid packing the cookies while they are still warm; this traps moisture and can make the cookies soggy. Store them in an airtight container at room temperature to keep them soft, adding a tortilla, apple wedge, or piece of bread to the container to extend their freshness.
By following these guidelines, your sugar cookies should come out beautifully every time, with the perfect texture and consistency whether you prefer them crispy or chewy.
Decorating Your Sugar Cookies
Icing Types and Recipes
Decorating sugar cookies is an art that combines creativity with culinary skill. Royal icing is the most popular choice due to its smooth, hard-drying nature, making it ideal for detailed designs. It consists of powdered sugar, egg whites or meringue powder, and flavorings like vanilla or lemon juice. For those starting, it’s advisable to use a stiffer consistency of royal icing for piping borders and a thinner consistency for flooding the cookie’s interior. This can be achieved by adjusting the water content until the desired viscosity is reached, akin to honey or shampoo for flooding.
Decorating Tools
The right tools are essential for sugar cookie decoration. Piping bags, available in materials like plastic, vinyl, or even reusable canvas, are crucial for precise icing application. Scribe tools or toothpicks help in fine-tuning details and popping air bubbles in the icing. For those looking to enhance their decorating station, a turntable can provide easy access to all sides of the cookie while decorating. Additionally, offset spatulas are invaluable for transferring cut-outs and smoothing icing. For intricate stencil work, a stencil genie aids in keeping stencils in place, ensuring crisp designs.
Creative Decorating Ideas
When it comes to decorating sugar cookies, the possibilities are endless. Beginners might start with simple polka dots or stripes using the wet-on-wet technique, where different colors of icing are applied while still wet to blend seamlessly. More advanced decorators can experiment with layering techniques, allowing the base layer to dry before adding new details on top, a method perfect for creating dimensional designs like flowers or intricate patterns. Seasonal themes like Christmas offer the opportunity to use colors and shapes, such as reindeer or snowflake designs, to bring festive cheer to your creations.
By mastering these techniques and using the appropriate tools, decorators can transform simple sugar cookies into stunning works of edible art, perfect for any occasion or celebration.
Conclusion
Through meticulous attention to ingredient selection, dough preparation, rolling, cutting, baking, and the artful task of decorating, we’ve explored the comprehensive journey to crafting the perfect Christmas sugar cookie. This process, blending both science and creativity, ensures that these festive treats are not only a joy to behold but a delight to taste. The essential techniques and tips shared herein aim to empower both novice bakers and seasoned pastry chefs to achieve flawless results, transforming simple ingredients into cherished holiday memories.
The significance of mastering this beloved holiday tradition extends beyond the kitchen, fostering a sense of connection and joy among family and friends. As these cookies emerge from the oven, golden and ready for decoration, they symbolize more than a delectable treat; they represent the warmth, love, and care infused into each step of their creation. With the guidance provided, readers are well-equipped to embark on their sugar cookie ventures, promising moments of joy and a sense of accomplishment in every bite.
FAQs
1. What is the key to baking the perfect cookie?
The secret to perfect cookies lies in using high-quality ingredients. Always opt for real butter, the appropriate type of sugar, and flour. Ensure that your flour is fresh, and choose quality chocolate if your recipe calls for it. Additionally, the method of creaming the butter and sugar together, beating in the eggs, and carefully folding in the flour plays a crucial role in achieving the best texture.
2. Which cookie is considered the quintessential Christmas cookie in the United States?
The most popular Christmas cookie in the United States is the Peanut Butter Blossom. This was determined by General Mills through an analysis of search data across all 50 states.
3. How can you enhance the flavor of sugar cookies?
To make sugar cookies taste better, ensure you use quality ingredients and follow the creaming method for mixing your dough. Adding a touch of pure vanilla extract or a pinch of salt can also elevate the flavor profile.
4. What technique prevents Christmas sugar cookies from spreading while baking?
To prevent your Christmas sugar cookies from spreading, avoid greasing the baking pan. Instead, line it with a silicone baking mat or parchment paper. This method helps maintain the shape of the cookies during baking without adding extra fat that might cause them to spread.


Christmas Cookies
Ingredients
- 2 ¾ cups all-purpose flour
- 1 teaspoon baking soda
- ½ teaspoon baking powder
- 1 cup unsalted butter softened
- 1 ½ cups white sugar
- 1 egg
- 1 teaspoon vanilla extract
- ½ teaspoon almond extract
- Colored sugar for decoration
Instructions
- Preheat your oven to 375 degrees F (190 degrees C).
- In a small bowl, stir together flour, baking soda, and baking powder.
- In a large bowl, cream together the butter and sugar until smooth.
- Beat in the egg, vanilla, and almond extracts.
- Gradually blend in the dry ingredients.
- Roll rounded teaspoonfuls of dough into balls, and place onto ungreased cookie sheets.
- Flatten each ball slightly with the bottom of a glass, and sprinkle with colored sugar.
- Bake for 8 to 10 minutes in the preheated oven, or until golden.
- Let cool on wire racks.